Version : 1.16
This guide aims to explain how to use the ASI API through definitions and examples.
The API reference documentation is available on https://api.asi.swiss/doc/.
A JSON schema guide is available on https://api.asi.swiss/doc/jsonschema_guide.html.
In a nutshell, the purpose of the API is to give access to ASI's devices' data on behalf of their users. Data and statistics can either be live streamed using Websockets, or retrieved afterwards using regular HTTP requests.
The API provides 4 category of resources: Users, Devices, Activities and Time frames. Users can have one of three User Roles: Administrator, Athlete or Manager. Devices represent the physical devices. User authentication is done using OAuth 2.0, which allows API clients (Applications) to access user data on behalf of the Athlete. Activities represent a sport session (e.g competition game or training) for which data from one or several Athletes has been or will be recorded. Data and analytics from the Activity can be retrieved for a specific Time frame. Multiple Time frames can be defined for a single Activity.
Note: in this document we may use the terms Clients, Applications or AMS (Athlete Management Systems) to refer to any registered Application using the API.
First, you need to create a Manager user. Then in order to access data from a Device, you need to take ownership of the device.
Before creating Activities and Time frames, an Athlete user must have been created by/for the user of the device. This will allow him to control the use of his personal data, regardless of the Devices he has been using. Then the Manager must be granted the permission to create Time frames (write) and query them (read) by the Athlete.
Once that is done, the Manager may start retrieving Live streaming data.
To summarize:
Analytics are computed from Device data based on the Athlete's profile and parameters from the Activity for a given Time frame. Results can be Live streamed or requested offline.
So the process is the following:
For live streaming, the Time frame should be created before the session.
It is also possible to only retrieve some basic raw sensor data, which are refered to as Preprocessed Data. This is also available as both livestreaming or post-session and does not require the steps above ; only a Device ownership.
Note: it is possible to define long Time frames (e.g. of a month or a year), so that Athletes do not need to give access to the Manager before each sport session.
Currently there are 4 categories of resources.
Users represent the functions of the persons using the API. Each user has a role, which defines what he is allowed to do on the API. On this API, all user-related endpoints are role-based. More information on users is provided below.
Devices represent the ASI devices that can generate data during a sport session. Devices are managed by ASI administrators.
A device can be owned by a manager. Once device's owner, the manager can access the preprocessed data produced by this device. Ownership is time-based, so that a device can be transferred to another manager, and the previous manager can still access device's preprocessed data produced during the time frame of his ownership.
A device needs to be activated to be used. Activation is done automatically when the first ownership starts. The device's ownership request and activation is done from the Device Activation webpage. A device should not have ongoing ownership to request an ownership, and conversely, have an ongoing ownership to release ownership. A manager can request a device's ownership if it has no ongoing ownership from another user. He will then become the owner of the device. A manager can release ownership of a device if he is the current owner of this device.
Activities represent the sport sessions, for example a soccer game. Activities are managed by users with manager role.
Creating an activity require a configuration field named json. It contains a JSON document with values required by referenced JSON schema. Values will be validated against the JSON schema.
JsonSchema is a resource type managed by ASI administrators' users only. It defines the mandatory metadata that an activity should have. There is generally one JSON schema per sport type.
When an administrator adds mandatory metadata, a new JsonSchema will be created, representing a new version of the schema.
For more information on JSON Schema, read the documentation at https://json-schema.org/.
Time frames links an athlete, a device and an activity together during a specified time frame. Time frames are managed by users with manager role.
Time frames along with activities are used by the platform to process the computed data produced by a Device, worn by an Athlete participating to an Activity. Managers can retrieve computed data given a time frame identifier. Only the managers who had/have READ permission on athlete data during a defined time frame can retrieve the computed data.
There are 3 types of user roles:
Unauthenticated users can only create new manager or athlete accounts.
The Administrator user type is reserved for ASI administrators.
The Athlete user role is used for athletes' accounts. Their profile contains basic data, such as first name, last name and physiological data, such as weight, height, maximum heart rate, etc. Athletes accounts can be created by any type of User.
Once logged in, an athlete can:
Manager user type is used for managers' accounts. Their profile contains basic data such as first name and last name. Managers accounts can be created by any type of User.
Once logged in, a manager can:
Authentication is made through OAuth 2.0. That means requests to the API require a Bearer token in the Authorization header. The supported authorizations grants are Authorization Code (Web Application Flow) and Resource Owner Password Credentials (Legacy Application flow).
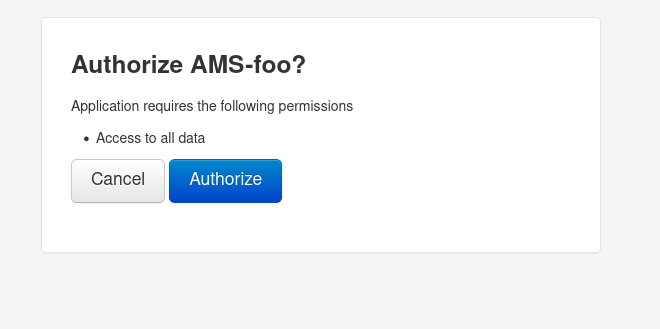
In case of Authorization Code grant, the AMS should request users' authorization to access their data on the platform. Users will be redirected to the ASI API login page, and once logged in, they can authorize or deny the AMS.
Registration of a new AMS can be made only by ASI administrators. AMS developers should follow the below steps to register their AMS.
| Key | Value |
|---|---|
| Grant Type | Authorization Code or Resource Owner Password Credentials |
| Callback URL | (Specific to the AMS client) |
| Authorize URL | /oauth2/authorize/ |
| Access token URL | /oauth2/token/ |
| Client ID | (AMS Client ID as provided by ASI administrators) |
| Client Secret | (AMS Client Secret as provided by ASI administrators) |
| Scope | all |
| Client Authentication | Basic Auth header |
If needed, the Revoke token URL is /oauth2/revoke-token/.
OAuth specification defines scopes. In this API, only one scope is registered: all. There is no granularity on the user's data that the client can access.
Important: the trailing slash in the URLs are mandatory.
Here is a minimal working example of a backend application implementing OAuth2 authorization through the "Authorization Code" flow.
To get an access token:
Python code
import fastapi
from fastapi.responses import HTMLResponse
import random
import requests
import urllib.parse
client_id = 'YOUR_CLIENT_ID_HERE'
client_secret = 'YOUR_CLIENT_SECRET_HERE'
redirect_uri = 'http://127.0.0.1:8000/authorized/' # for local development only
expected_state = None # don't handle state like this in production, this is just for the example
app = fastapi.FastAPI()
# this endpoint represents the part of your system that prompts the end-user
# for granting access on his behalf
@app.get("/authenticate")
async def authenticate():
global expected_state
print(f'(1) authenticating')
expected_state = random.randbytes(16).hex() # some random state to prevent CSRF attacks
# redirecting to ASI API for login
return fastapi.responses.RedirectResponse(
f"https://api.asi.swiss/oauth2/authorize/?"
f"client_id={client_id}"
f"&response_type=code"
f"&redirect_uri={urllib.parse.quote(redirect_uri)}"
f"&state={expected_state}",
status_code=302
)
# this endpoint is called by ASI API after the user successfully logs in and
# accepts the authorization
@app.get("/authorized")
async def callback(code: str, state: str):
print(f'(2) app authorized: authcode={code}')
assert state == expected_state
print(f'(3) fetching access token on behalf of user')
tokens = requests.post(
'https://api.asi.swiss/oauth2/token/',
data={
'grant_type': 'authorization_code',
'code': code,
'redirect_uri': redirect_uri
}, verify=False, allow_redirects=False,
auth=(
client_id, client_secret
)
).json()
# the result provides both an access token and a refresh token
# use the refresh token from now on to renew the access token
print(f'(3) access granted: token={tokens}')
# now that we have an access token, we are free to access the
# user's data and do anything with it
# for the example here we will just show the user how many
# devices he currently owns
res = requests.get(
f'https://api.asi.swiss/api/v1/devices/',
params={'current': True},
headers={'Authorization': f"Bearer {tokens['access_token']}"},
).json()
n_devices = res['count']
# this is an HTML example but you can do whatever you want after
# receiving your access token
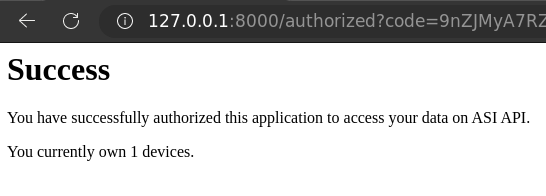
html_content = f"""
<html>
<head>
<title>Success</title>
</head>
<body>
<h1>Success</h1>
<p>You have successfully authorized this application to access your data on ASI API.</p>
<p>You currently own {n_devices} devices.</p>
</body>
</html>
"""
return HTMLResponse(content=html_content, status_code=200)
Getting an authorization by requesting the user's credentials: in this example, the user is asked to enter his userID and password. If the credentials are entered correctly, a token is provided.
import requests
import json
import getpass

client_id = '<<client_id>>'
client_secret = '<<client_secret>>'

asi_api_url = 'https://api.asi.swiss'
token_url = f'{asi_api_url}/oauth2/token/'

RO_user = input('Enduser netid: ')
RO_password = getpass.getpass(prompt='Enduser password: ')

data = {
  'grant_type': 'password',
  'username': RO_user,
  'password': RO_password
}

access_token_response = requests.post(token_url, data=data, verify=False, allow_redirects=False, auth=(client_id, client_secret))

tokens = json.loads(access_token_response.text)
Retrieving the list of athletes: with the token, your app has now access to the data. This simple example retrieves the list of devices owned.
api_call_url = f'{asi_api_url}/api/v1/athletes/'

access_token = tokens['access_token']
api_call_headers = {f'Authorization: Bearer {access_token}'}
api_call_response = requests.get(api_call_url, headers=api_call_headers, verify=False)

athletes = json.loads(api_call_response.text)
The platform allows Manager and Administrator users to live stream computed data for an ongoing activity, given a time frame identifier.
Live streaming is done through WebSocket (wss://). The path is /ws/v1/computed-data/{activity}/{timeframe}/.
activity (integer) is the activity identifiertimeframe (integer) is the time frame identifierThe platform allows all incoming connections, but requires the client to send an authentication message, containing an access token. This message must be the first one sent through this socket by the client, and it must be done before a timeout, configured to 3 seconds.
If the token allows the platform to authenticate a known Manager or Administrator user, then data will be live streamed. Otherwise, the connection is closed.
Important: Manager user must have a read permission on the Athlete linked to the Time frame to live stream their data.
The expected authentication message is a JSON document containing a single token key.
{
    "token": "<access_token>"
}
Computed data messages are JSON documents containing the computed data. For example:
{
    "total_distance": 83.20118419047552,
    "accelerations": {
        "threshold_2": {
            "threshold": 3,
            "values": []
        },
        "threshold_1": {
            "threshold": 2,
            "values": []
        }
    },
    "decelerations": {
        "threshold_2": {
            "threshold": 3,
            "values": []
        },
        "threshold_1": {
            "threshold": 2,
            "values": []
        }
    },
    "max_speed": 1.1826,
    "average_speed": 0.20038889929742307,
    "last_timestamp": 1597924127900.0
    // other data
}
Note: computed data may vary depending on the activity and time frame configurations.
It is also possible to subscribe to all computed data concerning an activity. In that case, the path that needs to be used is /ws/v1/computed-data/{activity}/.
The Manager is allowed to stream theses data if he's allowed to stream every activity's time frames computed data.
Computed data are still processed for each time frame, so messages received through this socket concerns only one time frame per message.
Each message has a timeframe key containing the time frame ID for which computed data are processed.
For example:
{
    // Time frame id
    "timeframe": 86,
    // Computed data for this timeframe
    "data": {
        "total_distance": 83.20118419047552,
        "accelerations": {
            "threshold_2": {
                "threshold": 3,
                "values": []
            },
            "threshold_1": {
                "threshold": 2,
                "values": []
            }
        },
        "decelerations": {
            "threshold_2": {
                "threshold": 3,
                "values": []
            },
            "threshold_1": {
                "threshold": 2,
                "values": []
            }
        },
        "max_speed": 1.1826,
        "average_speed": 0.20038889929742307,
        "last_timestamp": 1597924127900.0
    }
}
Similary to computed data, managers can also subscribe to a WebSocket stream of preprocessed data for a given device.
The path is /ws/v1/preprocessed-data/{device}/.
Important: Manager user must be the device owner when he subscribe to the WebSocket.
Authentication works the same as with computed data, previously explained.
In addition to the token key in the authentication message, an optional params key can be specified.
For example:
{
    "token": "your_token",
    "params": {
        "buffer_size": 10,
        "drop_older": true,
        "flush_timeout": 20
    }
}
By default, messages are forwarded to the WebSocket client as soon as they are ready, without any guarantee of arriving in the right order. This problem is inherent to the real-time and distributed architecture but can be mitigated by setting the parameters such that the messages are buffered and reordered first. If buffer_size is set to some value n > 0, the last n messages are held in the buffer and the oldest (according to its timestamp) is released when the buffer exceeds n messages. This ensures the right ordering of messages up to the last n messages. By default, buffer_size is set to 0 meaning that no buffering is performed.
Note: buffering n messages implies a delay of about n seconds.
If a message arrives that is older than the last forwarded message (meaning it is about n seconds late at least), it will still be forwarded unless drop_older is set to true, in which case it is simply dropped. Dropping these messages is the only way to completely guarantee the right order.
To ensure all messages are forwarded even after device disconnection, the buffer is flushed (in the right order) after flush_timeout seconds.
The following table explains the params utility
| Param | Possible values | Default | Description |
|---|---|---|---|
buffer_size |
integer in [0,60] |
0 |
Size of reordering buffer |
drop_older |
true | false |
false |
Control if incoming message older than the last forwarded one should still be sent or dropped |
flush_timeout |
integer in [2,62] |
10 |
Timeout after which the messages in the buffer will be forwarded, should be greater or equal to buffer_size + 2 |
Note: in most cases, when messages arrive in wrong order without any params, it is just one message arriving right after its successor. So, a buffer of size 3 would cover a majority of cases, and the delay is not so big (~ 3 seconds)
In this scenario, a manager called A uses the platform to create an activity and two time frames prior to a tennis match, where athletes B and C play against each other.
First, A should activate the devices used during this match.
A send a POST request to /api/v1/devices/1/take-ownership/ to own the device 1.
A send a POST request to /api/v1/devices/2/take-ownership/ to own the device 2.
Both B and C should give write permission to manager A to let him create a time frame related to them.
B send POST request to /api/v1/athletes/2/managers/2/permissions/ (the first 2 is athlete B's ID, the second 2 is manager A's ID) with the following JSON body to give write permission to A for the entire year 2020. C do the same with his ID in the URL.
{
    "start_time": "2020-01-01T00:00:00.000Z",
    "expiration_time": "2020-12-31T23:59:59.000Z",
    "permission": "WRITE"
}
B and C can also give read permission to manager A to let A retrieve or stream their (computed) data. To do that, they should use the same request as for write permission, but with value READ instead of WRITE at key permission in the JSON body.
A send a POST request to /api/v1/activities/ with the following JSON body to create the activity.
{
    "name": "Tennis match of 30 may 2020 at Wimbledon",
    "json": { "sport": "tennis", "type": "match" },
    "json_schema": 2, // JsonSchema ID correspondig to tennis
    "owner": 1 // ID of manager A
}
A send a POST request to /api/v1/timeframes/ with the following JSON body to create the time frame for athlete B wearing device 1, starting at 20:00 and ending at 22:00.
{
    "start_time": "2020-05-30T20:00:00.000Z",
    "end_time": "2020-05-30T22:00:00.000Z",
    "params": {}, // Seed doc for examples
    "device": 1, // ID of device worn by athlete B
    "activity": 1, // ID of previously created activity
    "athlete": 2, // ID of athelte B
    "owner": 1, // ID of manager A
    "json_schema": 4 // ID of json schema
}
A send a POST request to /api/timeframes/ with the following JSON body to create the time frame for athlete C wearing device 2, starting at 20:00 and ending at 22:00.
{
    "start_time": "2020-05-30T20:00:00.000Z",
    "end_time": "2020-05-30T22:00:00.000Z",
    "params": {}, // Seed doc for examples
    "device": 2, // ID of device worn by athlete C
    "activity": 1, // ID of previously created activity
    "athlete": 3, // ID of athelte C
    "owner": 1, // ID of manager A
    "json_schema": 4 // ID of json schema
}
As A has read permission on athletes B and C, he can live stream the compted data of both athletes, through WebSocket. For computed data of athlete B, A can open a WebSocket on /ws/v1/computed-data/1/2/; 1 is the activity ID, and 2 is athlete B's time frame ID.
Changes to activities and timeframes can be subscribed to using activity webhooks. This allows for example to keep activities and timeframes in sync when they are shared across multiple apps, which otherwise wouldn't know when a change has been submitted by another app.
To set up an activity webhook, you need:
The following example registers the callback URL https://myapp.example/callback for all events relating to the activity 123 :
// POST /api/v1/activities/123/webhooks/
{
	"webhook_url": "https://myapp.example/callback",
	"secret_token": "56789ABCD",
	"activity_events": true,
	"timeframes_events": true
}

// Response:
{
	"id": 99,
	"webhook_url": "https://myapp.example/callback",
	"secret_token": "56*******",
	"activity_events": true,
	"timeframes_events": true
}
Notice the webhook id returned. This will allow to update or delete the webhook by querying the URL /api/v1/activities/123/webhooks/99/. You can also lists all activity webhooks by using a GET request to /api/v1/activities/123/webhooks/ (response is paginated).
Now let's say the event we are tracking is delayed and we want to update the timeframe 42 associated to this activity:
// PATCH /api/v1/timeframes/42/
{
	"start_time": "2023-03-12T13:00:00+0100"
}
Then this will trigger the sending of the following request:
// POST https://myapp.example/callback
// X-Asi-Api-Token: 56789ABCD
{
  "event": "timeframe-updated",
  "webhook_id": 99,
  "data": {
    "activity_id": 123,
    "timeframe_id": 42
  }
}
Here are all the events that could be triggered for a given activity:
"activity_events": true, callback will receive following events
activity-updatedactivity-deleted"timeframe_events": true, callback will receive following events
timeframe-createdtimeframe-updatedtimeframe-deletedThe event data sent to the callback URL will only contain the id(s) of the resource(s) (activity or activity+timeframe), so that you will get the actual latest values by issuing an appropriate GET query.